
Exploring the realm of DIY Siding Replacement Tips for Budget Renovators, this introduction sets the stage for a detailed and informative journey. From the advantages of taking a hands-on approach to the intricacies of selecting the right materials, this guide covers it all with a mix of practical advice and expert insights.
As we delve deeper into the nuances of DIY siding replacement, you’ll gain valuable knowledge that can empower you to undertake this project confidently and successfully.
Importance of DIY Siding Replacement
When it comes to home renovations, opting for a do-it-yourself (DIY) approach can be a cost-effective way to tackle projects, including siding replacement. Not only can it save you money on labor costs, but DIY siding replacement also offers a range of benefits that make it a popular choice among budget-conscious renovators.
Cost-Effective Solution
One of the main advantages of DIY siding replacement is the potential for significant cost savings. By taking on the project yourself, you eliminate the need to hire professional contractors, which can be a major expense. With the right tools and materials, you can complete the replacement at a fraction of the cost, making it a budget-friendly option for homeowners.
Control Over Process and Outcome
DIY siding replacement also gives you greater control over the entire process and the final outcome. You can choose the materials, colors, and styles that best suit your preferences and budget, without having to compromise on your vision. Additionally, by handling the project yourself, you have the opportunity to ensure that every detail is executed to your satisfaction, resulting in a customized finish that reflects your personal taste.
Choosing the Right Siding Material
When it comes to siding materials for budget-friendly renovations, it’s crucial to consider both cost and durability. Selecting the right siding material can significantly impact the overall look and longevity of your home exterior.
Vinyl Siding
- Pros: Affordable, low maintenance, wide range of colors and styles.
- Cons: Susceptible to cracking and fading over time.
Fiber Cement Siding
- Pros: Durable, fire-resistant, can mimic the look of wood or stone.
- Cons: Higher initial cost compared to vinyl, requires painting or caulking maintenance.
Engineered Wood Siding
- Pros: Cost-effective, environmentally friendly, can be painted or stained.
- Cons: Prone to moisture damage if not properly maintained.
Metal Siding
- Pros: Long-lasting, resistant to insects and rot, recyclable.
- Cons: Can dent easily, may require repainting over time.
Choosing the Right Material
- Consider your budget: Determine how much you can afford to spend on siding installation and maintenance.
- Think about durability: Evaluate the climate in your area and choose a material that can withstand harsh weather conditions.
- Match your aesthetic preferences: Select a siding material that complements the architectural style of your home and enhances its curb appeal.
Tools and Equipment Needed

When taking on a DIY siding replacement project, having the right tools and equipment is crucial for a successful and efficient outcome. Not only will the proper tools make the job easier, but they can also help ensure that the installation is done correctly.
Essential Tools for DIY Siding Replacement
- Siding Nailer: A siding nailer is a specialized tool designed for installing siding quickly and securely. It helps to ensure that the siding is properly attached to the exterior of your home.
- Tape Measure: Accurate measurements are essential when cutting siding to fit around windows, doors, and corners. A reliable tape measure will help you get the right dimensions every time.
- Circular Saw: A circular saw is necessary for cutting siding panels to the correct size. Make sure to use a fine-toothed blade to prevent chipping or splintering.
- Level: To ensure that your siding is installed straight and level, a good quality level is a must-have tool. This will help you avoid crooked siding lines that can detract from the overall look of your home.
- Utility Knife: A sharp utility knife is essential for cutting and trimming siding panels with precision. It’s also handy for scoring and snapping vinyl siding.
Where to Rent or Purchase Tools Economically
If you don’t already own all the tools needed for your siding replacement project, consider renting them from a local hardware store or home improvement center. Many places offer tool rental services at affordable rates, allowing you to access high-quality tools without breaking the bank.Alternatively, you can purchase the tools you need from hardware stores, online retailers, or even second-hand shops.
Look for sales, discounts, or bundled deals to save money on your tool purchases.
Benefits of Having the Right Tools
Having the right tools for your DIY siding replacement project can make the entire process smoother and more efficient. Proper tools can help you work faster, more accurately, and with less effort, resulting in a professional-looking finish. Investing in quality tools upfront can save you time and frustration in the long run, ensuring that your siding replacement project is a success.
Preparation and Planning
When it comes to DIY siding replacement, proper preparation and planning are crucial for a successful renovation project. By taking the time to prepare the area and plan out your project, you can avoid costly mistakes and ensure a smooth process from start to finish.
Preparing the Area
Before starting the siding replacement project, make sure to:
- Clean the existing siding and trim to remove any dirt, debris, or loose paint.
- Inspect the exterior walls for any signs of damage, such as rot or mold, and address these issues before proceeding.
- Remove any obstacles or furniture near the work area to provide ample space for the renovation.
Proper Planning
To avoid costly mistakes during the project, consider the following tips:
- Measure the area accurately to determine the amount of siding and materials needed for the renovation.
- Order materials in advance to ensure they arrive on time and avoid delays in the project timeline.
- Create a detailed timeline outlining each step of the renovation process, from preparation to installation, to stay organized and on track.
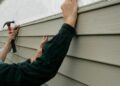
Installation Techniques
When it comes to replacing siding on your home, using the correct installation techniques is crucial to ensure a professional-looking finish. Here, we will discuss different methods for installing siding, provide step-by-step instructions, and highlight common pitfalls to avoid.
Horizontal Installation
- Start by attaching a starter strip along the bottom of the wall to provide a level base for the siding panels.
- Overlap each siding panel slightly to prevent water infiltration and secure them in place with nails or screws.
- Use a level to ensure each panel is installed straight and maintain consistent spacing between panels for a uniform look.
Vertical Installation
- Begin by installing corner pieces to provide a neat edge for the siding panels to butt up against.
- Secure each siding panel vertically, ensuring they are plumb and evenly spaced for a clean appearance.
- Trim pieces may be needed to finish edges and corners for a polished look.
Step-by-Step Replacement
- Remove existing siding carefully, starting from the top and working your way down to avoid damage to the underlying structure.
- Inspect the sheathing for any damage and make any necessary repairs before installing new siding.
- Follow manufacturer guidelines for installing the chosen siding material, ensuring proper overlap and fastening techniques.
Common Pitfalls and Tips
- Avoid overdriving nails or screws, as this can cause warping or damage to the siding material.
- Check for proper alignment and spacing during installation to prevent crooked or uneven siding.
- Take time to properly flash around windows, doors, and other openings to prevent water infiltration and ensure a watertight seal.
Finishing Touches and Maintenance
After successfully installing new siding on your home, it’s essential to focus on the finishing touches and maintenance to ensure the longevity and curb appeal of your property. Here are some tips to help you wrap up your siding replacement project and keep your home looking great for years to come.
Final Touches
- Inspect the entire siding installation for any gaps or loose pieces. Secure any loose siding panels and fill in any gaps to ensure a seamless finish.
- Apply a fresh coat of paint or sealant to protect the siding from weather elements and enhance its appearance. Choose a high-quality paint or sealant that is suitable for the siding material you have installed.
- Replace or repair any damaged trim or molding around windows, doors, and corners to complete the look of your new siding.
Maintenance Tips
- Regularly clean your siding with a mild detergent and water to remove dirt, dust, and debris. Avoid using harsh chemicals or abrasive cleaners that could damage the siding material.
- Inspect your siding annually for signs of wear and damage, such as cracks, dents, or discoloration. Address any issues promptly to prevent further damage and maintain the integrity of your siding.
- Trim any overgrown vegetation near your home to prevent it from coming into contact with the siding, which could cause damage over time. Keep bushes, trees, and vines trimmed back to maintain a clear space around your home.
Enhancing Curb Appeal
- Add decorative elements, such as window boxes, shutters, or outdoor lighting, to enhance the visual appeal of your home and complement your new siding. Choose elements that match the style and color of your siding for a cohesive look.
- Upgrade your landscaping with new plants, flowers, and hardscaping features to create a welcoming and attractive exterior for your home. Consider adding a fresh coat of paint to your front door or updating your mailbox for an extra pop of color.
- Invest in outdoor furniture, patio accessories, or a new front porch design to create an inviting outdoor space that complements your new siding and adds value to your home.
Final Review
In conclusion, DIY Siding Replacement Tips for Budget Renovators offers a wealth of information to guide you through every step of the process. By following the recommendations Artikeld here, you can achieve a cost-effective renovation without compromising on quality or style.
FAQ Insights
What are the benefits of choosing a DIY approach for siding replacement?
Opting for a DIY approach can save costs on labor, give you greater control over the project, and provide a sense of accomplishment.
How do I select the right siding material within my budget?
Consider factors like cost, durability, and aesthetic appeal when choosing siding material. Look for options that offer the best balance for your needs.
What are some essential tools needed for DIY siding replacement?
Essential tools include a hammer, tape measure, level, circular saw, and utility knife. These tools are crucial for a successful project.
How can I enhance the curb appeal of my home after siding replacement?
You can enhance curb appeal by adding finishing touches like decorative trims, fresh paint, and landscaping improvements. These details can elevate the overall look of your home.
What are common pitfalls to avoid during siding replacement?
Common pitfalls include incorrect measurements, improper installation techniques, and neglecting proper planning. Avoiding these mistakes can ensure a smooth renovation process.


